Radon Mitigation South Duxbury MA
Radon is an odorless, colorless gas that poses significant health risks when allowed to accumulate in homes or workplaces. South Duxbury, MA, is not exempt from this hidden hazard, and many residents face the challenge of managing radon levels. Addressing radon concerns is not just a matter of comfort—it can protect you from long-term health issues like lung cancer.
Effective radon mitigation is crucial for maintaining safe indoor spaces. Understanding the basics of radon, its risks, and the available mitigation solutions can help homeowners in South Duxbury take the right steps.
Real People - Real Great Results
Crawl Space Video Playlist
What Is Radon and Why Is It a Concern?
Radon is a stealthy adversary. It’s a naturally occurring radioactive gas that forms when uranium in soil, rock, or water breaks down over time. True to its understated nature, radon is odorless, colorless, and tasteless, making it impossible to detect without specific testing equipment. Just because you can’t see or smell it doesn’t mean it isn’t there—it might be creeping into your home right now.
How does it get in? Imagine your house as a fortress with hidden cracks. Radon can infiltrate through tiny gaps in your foundation, walls, or floors—anywhere that connects your living space to the soil beneath. The pressure difference between your home and the ground serves as an open invitation for radon to invade, like it owns the place.
So why does it matter? Here’s the grittiest truth: prolonged exposure to elevated radon levels is a leading cause of lung cancer, second only to smoking. The Environmental Protection Agency (EPA) has warned that radon exposure kills about 21,000 people in the U.S. each year. That’s not scare tactics; it’s math. Living with unchecked radon isn’t a gamble you want to take. Those invisible particles pack a punch with long-term consequences.
Radon in South Duxbury, MA: A Local Perspective
South Duxbury isn’t just a postcard-worthy spot with its quaint charm and coastal breezes—it also sits on soil that can quietly put its residents at risk. The geological makeup of the area includes granite and other uranium-rich materials, which can release radon as they naturally break down. This means South Duxbury homes, particularly those with basements or slab-on-grade foundations, are especially susceptible to radon infiltration.
State data from Massachusetts indicates that radon levels vary widely across the region but often exceed the EPA’s recommended threshold of 4 picocuries per liter (pCi/L). While not every home in South Duxbury faces high radon levels, testing reveals pockets of significantly elevated readings. Unfortunately, radon isn’t something you can see or sniff out, so many homeowners remain unaware of the risk until they test—or until it’s too late.
The takeaway? In South Duxbury, assuming your home is safe without testing is a gamble you don’t want to take. Airing out your home or cracking the windows won’t cut it; proactive testing and mitigation, if needed, are your best bets for ensuring your family’s long-term health. After all, ignoring radon is like ignoring a slow leak—it may not seem urgent, but left unchecked, it could wreak havoc over time.
How Radon Testing Works
Testing for radon isn’t rocket science—it’s a straightforward process anyone can tackle, though there’s always the option to call in the pros if needed. At its core, radon testing falls into two categories: short-term tests and long-term tests. Short-term tests are the fast-track option, typically lasting anywhere from 2 to 7 days. These are great if you want a quick snapshot of your home’s radon levels, especially if you’re buying or selling property. Long-term tests, on the other hand, stretch over 90 days or more, offering a more accurate representation of your home’s average radon exposure over time.
DIY testing kits are widely available at hardware stores or online and don’t require any complicated setup. You simply place the test in the lowest lived-in area of your home—like a basement or first floor—following the instructions to the letter. This isn’t the time for guesswork; proper placement matters. Don’t plop the test next to a drafty window or within arm’s reach of a heating vent. Once the testing period ends, you seal the device and mail it to the lab listed in the kit. Results typically come back in a week or two, giving you a clear idea of whether you’re dealing with safe levels or need to take action.
For a deeper dive into radon’s behavior in your specific home, professional radon inspectors are another solid option. Armed with advanced equipment like continuous radon monitors, they can provide a more precise analysis and even pinpoint potential problem areas in your house. Think of them as the radon equivalent of a detective—they’ll help you track down the “how” and “why” of elevated levels, making it easier to figure out next steps. Whether you go DIY or professional, the key is simple: don’t skip the test. It’s a first step you’ll be glad you took.
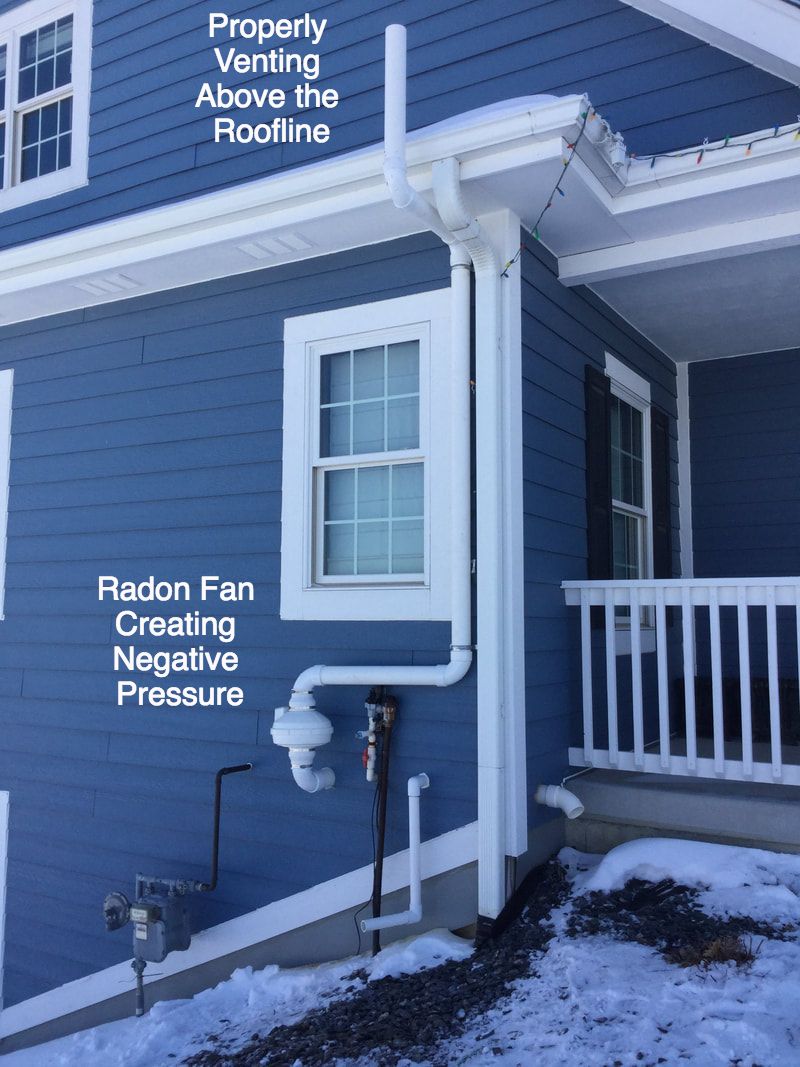
Radon Mitigation Strategies
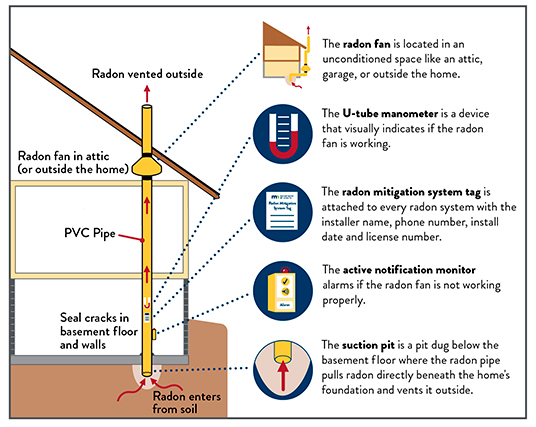
When it comes to keeping radon at bay, it’s all about smart, proven strategies. The gold standard in radon mitigation is sub-slab depressurization, essentially creating a vacuum beneath your home to redirect radon gas before it can enter your living space. A PVC pipe system paired with a continuously running fan does the heavy lifting here—simple, effective, and widely used.
For homes with smaller issues, sealing cracks in your foundation, walls, or floors can help. Keep in mind, though, that sealing alone isn’t enough for significant radon levels—it’s more of a supporting player than a lead actor.
Ventilation upgrades are another solid option. Better airflow, especially in crawlspaces or basements, can help push radon-laden air out and prevent buildup. Even something as basic as opening windows won’t hurt—though it’s hardly a permanent fix and doesn’t work well in extreme weather.
Costs vary based on your home’s design and the complexity of the system you need. Basic installations for sub-slab systems might set you back around $1,000–$2,500. Larger, more complicated setups? Those climb higher—think $3,000 and up. Don’t let sticker shock deter you. When compared to the health risks, it’s an investment worth making.
Steps To Take if Radon Levels Are High
1. Confirm Results: The first step is simple but critical—verify. If your initial radon test shows high levels, don’t panic, and don’t jump to expensive fixes just yet. Retest the space using either a second short-term kit or, better yet, a long-term test for a more accurate average. Conditions like weather or improper placement of the testing device can skew results. Double-checking eliminates any doubt before you commit to mitigation.
2. Consult a Professional: If the retest confirms elevated radon levels, it’s time to call in the pros. DIY options exist, but radon mitigation isn’t something you want to wing. Certified radon specialists can identify the radon’s entry points and recommend the best strategy for your specific home. Look for a contractor certified by the National Radon Proficiency Program (NRPP) or the National Radon Safety Board (NRSB)—their credentials mean you’re not dealing with guesswork.
3. Install a Mitigation System: Based on your consultation, you’ll likely end up with a mitigation system designed for your home’s layout. Most South Duxbury homes benefit from sub-slab depressurization, a method that essentially vacuums radon out from beneath your foundation and safely vents it outside. Sealing cracks and openings is typically part of the process but won’t be enough on its own if radon levels are high. Expect the installation to take a day, give or take, with minimal disruption to your routine.
Each of these steps is straightforward, but together, they’re a solid response to a subtle, high-stakes problem. If you tackle radon mitigation methodically, you’ll go from testing to breathing easy in no time.

The Importance of Regular Maintenance
Installing a radon mitigation system is not a one-and-done deal—it requires ongoing attention to ensure it continues working effectively. Over time, components can wear out, seals may degrade, or the system’s airflow might become obstructed. These subtle changes can reduce the system’s efficiency, allowing radon levels to creep back up without you even realizing it.
Routine inspections are the backbone of keeping these systems in check. For most setups, a professional inspection every two to three years is a solid rule of thumb. During these checkups, technicians will test radon levels, examine system components like fans and piping, and ensure everything is functioning as it should. If your system includes filters or vent fans, those components may need replacing even sooner—typically every 12 to 24 months, depending on manufacturer guidelines.
Homeowners should also keep an eye on any warning indicators built into the system, such as pressure gauges or alarms, which can signal a malfunction. Make it part of your seasonal maintenance routine—check for moisture pooling near pipes, listen for strange fan noises, or do a quick visual inspection to spot any cracks or blockages.
By staying consistent with maintenance, you safeguard not just your indoor air quality but also the investment you’ve made in protecting your home. Skipping these steps isn’t worth the risk—radon doesn’t take days off, and neither should your mitigation system’s upkeep.
Building Radon Safety Awareness
Radon is one of those things most people never think about—until it’s too late. Education is the first and most important step in tackling this invisible threat, and it needs to happen at both the individual and community level. Homeowners in South Duxbury should start by learning the basics: what radon is, why it’s dangerous, and how to test for it. Information isn’t hard to come by, but taking the time to understand it can make all the difference.
Beyond personal awareness, community efforts can amplify the message. Imagine a local library hosting a free radon workshop or a neighborhood group pooling resources for discounted radon test kits. These small-scale initiatives have a way of making a big impact. Schools, civic organizations, and even real estate agents could get involved, spreading the word and normalizing radon testing as part of routine home care.
The takeaway is simple: safety starts with awareness. When individuals and communities work together to stay informed, radon becomes a manageable risk rather than an overlooked danger. South Duxbury has an opportunity to set the standard for radon safety—one informed homeowner at a time.
Conclusion
Living in South Duxbury, MA, comes with its share of natural beauty—and natural risks. Radon, while invisible and odorless, isn’t something you can afford to ignore. The good news? Mitigating radon isn’t rocket science. It’s a matter of awareness, action, and a bit of routine upkeep. Whether it’s installing a sub-slab depressurization system or sealing up those sneaky cracks in your foundation, the steps are clear, the solutions proven. Testing your home, addressing high levels, and maintaining mitigation systems can turn a hidden hazard into a non-issue. At the end of the day, protecting your family’s health and making your home radon-safe isn’t just smart—it’s necessary. South Duxbury deserves nothing less than a community of homes built to breathe easy.
Reviews from Happy Customers
Our top priority is customer satisfaction, and we work closely with clients to understand their unique needs and goals.


