
A crawl-space estimate should explain the wet ground, air, framing, access, and equipment below your Portsmouth floor. 603 gets into the space, identifies the sequence, and writes the scope. Projects commonly run from $3,000 to $25,000.
Start with the air above the crawl
A Portsmouth homeowner often calls about the room over the crawl, not the crawl itself. The floor feels cold, the house has a stale smell after humid weather, or a dehumidifier seems to run without catching up. Those are useful clues because air and moisture move through openings around plumbing, wiring, framing, and the access hatch.
We get inside the space and follow the evidence. Damp soil, loose fiberglass, sweating ductwork, stained joist ends, open vents, and an incomplete sheet of plastic do not all call for the same scope. The first question is whether liquid water is entering. If it is, drainage comes before sealing.
What a complete seal has to include
Encapsulation separates the building from the exposed ground. The floor liner must cover the usable footprint, seams need a durable overlap and seal, and the wall barrier has to meet the floor system without leaving an open path. Piers, pipes, and irregular corners are detailed individually. A neat center section does little good if the perimeter still exchanges damp air.
Once the boundary is continuous, we address the moisture left inside. That normally means a crawl-space dehumidifier sized and drained for the space. It is not there to overpower outdoor humidity leaking through open vents; it works after the crawl has become a controlled part of the building.
Portsmouth access can change the plan
Low headroom and narrow hatches affect labor more than glossy before-and-after pictures suggest. We measure the access, note utilities crossing the route, and decide how old insulation and debris can leave the building without dragging through finished rooms. If another trade will need the crawl later, we keep service paths usable instead of wrapping every object into the liner.
Rot or movement is a separate decision. A white liner can make a crawl look finished while weakened wood remains above it. We probe suspect framing, look at sill and beam connections, and call out structural work before the moisture system hides the view.
A useful scope is specific
The proposal should tell you what comes out, which surfaces are sealed, whether drainage or a pump is included, where the dehumidifier drains, and what happens at the hatch. It should also identify exclusions. Pest work, major electrical relocation, plumbing repair, and framing replacement should not appear later as a surprise disguised as “site conditions.”
Crawl-space work commonly falls between $3,000 and $25,000. Area, clearance, cleanup, water control, and damaged framing explain most of that spread. 603 prices the space after entering it and gives the scope in writing.
Before the appointment
- Notice whether the smell is strongest after rain or during humid summer weather.
- Photograph the hatch and the widest route to it.
- Do not remove wet insulation immediately if it is still showing where moisture travels.
- Tell us about standing water, pests, old pumps, and rooms above that feel different.
You do not need to crawl under the house yourself. A few observations from the rooms above and the exterior access help us arrive prepared.
What a customer said about this kind of work
Know what should change upstairs
The purpose is not a photogenic crawl. It is a more stable moisture environment beneath the house. Before work begins, write down the smell, humidity reading, condensation, cold-floor areas, and how often portable equipment runs. Those observations give you a practical before-and-after comparison without inventing a promise about comfort or energy savings.
After installation, keep the access clear and look at the dehumidifier drain and humidity display periodically. If another contractor enters the space, tell them not to cut the liner or fasten through the wall barrier. A small plumbing or wiring job should not quietly undo the sealed boundary.
How a 603 project moves from question to closeout
1. Establish the history
The visit starts with your timeline. We ask what changed, what weather was involved, and what has already been tried before we inspect the affected area.
2. Inspect the connected area
We photograph and measure the relevant surfaces, trace access and utilities, and distinguish observations from assumptions. If another specialist is needed, that belongs in the conversation.
3. Put the scope in writing
The written proposal names the physical work, materials, access, exclusions, price, and warranty. You should be able to compare it line by line with another bid.
4. Confirm before work starts
Before work, the crew confirms protection and the route in and out. During the job, hidden conditions that truly change scope are shown and discussed rather than silently covered.
5. Walk through the result
At completion, the lead walks through the installed work, normal homeowner checks, and any follow-up measurement. Records and photographs should make the result understandable later.
Compare crawl-space proposals at the edges
Ask how the liner meets walls, columns, steps, pipes, and the hatch. Ask where the dehumidifier drains and how a technician reaches it. If water is present, ask where it is collected and where it leaves the property. Those answers reveal more than a liner thickness printed in large type.
Also ask what happens to old insulation and debris, whether framing is inspected, and who owns electrical or pest work. A lower price may simply leave those decisions outside the contract. A higher price is not automatically better unless its added work solves an observed condition.
After the crawl is sealed
Give the system a normal operating period before judging it by one afternoon. Watch the humidity trend, notice whether odor returns, and make sure condensate reaches its drain. Keep the hatch closed as designed. Opening vents “for fresh air” changes the boundary the equipment was sized to control.
Once a year, inspect the visible seams and the path used by plumbers or electricians. Sharp tools and new fasteners are more common causes of liner damage than material failure. If a leak occurs above the crawl, dry it promptly and identify it as plumbing water rather than assuming the encapsulation created the event.
A new liner should not hide an old problem
The most common bad shortcut is treating every crawl-space concern as a vapor-barrier job. Ground moisture, flowing water, plumbing leaks, pests, and weakened framing need different responses. We name those conditions separately and put them in sequence. Encapsulation is valuable when it completes the moisture boundary; it is not a reason to skip drainage or structural work that the inspection actually finds.
What the Portsmouth crawl inspection cannot see
Finished ceilings, inaccessible pockets, and material tight against framing can limit the view. We record those limits and do not claim that a hatch-side inspection proves every joist is sound. If cleanup reveals concealed damage, the crew shows it before adding work. The free visit produces a recommendation from accessible evidence; it is not permission to invent certainty behind a wall.
If you choose not to proceed immediately, keep the crawl dry enough to inspect and do not cover questionable framing. Save the estimate with your photographs so the next visit begins with a timeline instead of another guess.
Portsmouth is context, not a diagnosis
Portsmouth's citywide median housing year is 1958 in the 2023 American Community Survey. That number cannot identify the foundation, floor, drainage, or previous repairs at one address. We confirm those details in the house.

What 603 work looks like
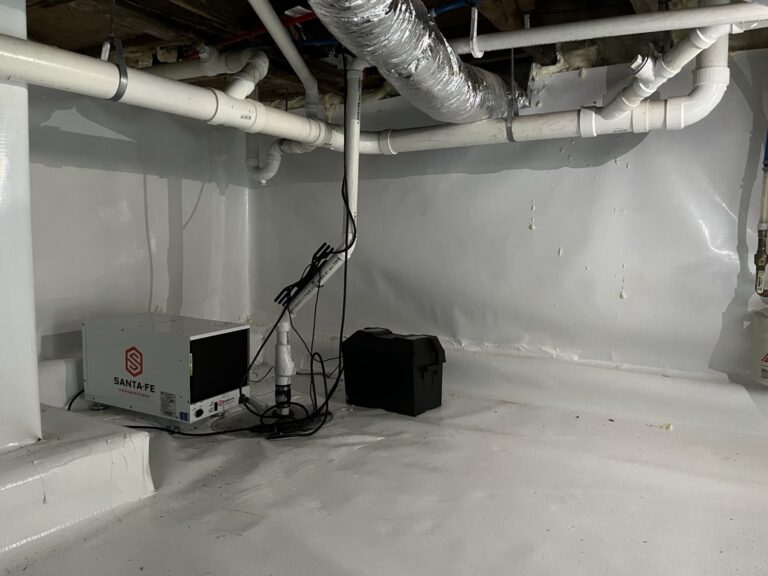
603 warrants the encapsulation liner, wall barriers, and installation workmanship for 25 years. The dehumidifier is covered under the manufacturer's separate terms.
Questions Portsmouth homeowners ask
Will Portsmouth crawl-space encapsulation stop a musty smell?
It can reduce crawl air and ground moisture entering the house when the odor source is the crawl. 603 first checks for standing water, leaks, pests, and damaged wood that need separate work.
Does every crawl need a sump pump?
No. A pump is included when liquid water needs active removal. A crawl with ground vapor but no recurring collection problem may need sealing and dehumidification instead.
Can other contractors enter after encapsulation?
Yes. Show them the intended travel path and ask them to protect the liner. Any new pipe, wire, or fastener through the boundary needs to be sealed correctly.
Related help
See the full crawl space encapsulation service, find every town on the service-area map, or read straight answers to basement questions.
Get a free inspection in Portsmouth
We will look at the actual house, explain what needs attention and what does not, and give you a written estimate.
Housing-year reference: U.S. Census Bureau, 2023 ACS 5-year table B25035.
Common questions about crawl spaces
- What are the top reasons for immediate house foundation repair and crawl space encapsulation?
- What challenges should I expect fixing squeaky floors in a house with a short crawl space?
- What is the difference between a crawl space and a basement?
- What is the difference between a moisture barrier and a vapor barrier?
- What should the humidity in a crawl space be at different times of year?
- Why, after so many years living without it, is crawl space encapsulation so recommended now, when it lasts 10-15 years and costs half of a foundation repair?
- Can ‘dormant’ mold spores appear and affect a crawl space?
- Can I use plastic sheeting as a vapor barrier?
- Crawl space is infested with mold, how do we go about properly fixing it?
- Does crawl space encapsulation increase home value?
- Does encapsulating a crawl space really work and is it worth the money?
- How does a vapor barrier function?